breakfast of champions, by “the kitchen twins”

This article was written by two 16-year-old chefs, The Kitchen Twins.
To us, having a good, filling and nutritious breakfast is super important to set our day on a good path. If we are hungry, in our family it is known as a “food mood” (our dad is the biggest culprit especially because he’ll be the one to skip breakfast).
If we have something big going like a field hockey or lacrosse game, a test, presentation, or whatever it is, we feel the need to get extra fueled up. On days with no athletic stuff, we may do a lighter breakfast like a smoothie or yogurt, but in these cases we do get hungry faster so we tend to need to eat more of a carb, fiber and protein rich breakfast because it keeps us fuller longer. Here are some delicious options whether you have 1 minute before you run out the door or 30 minutes to turn on some music and make and eat a nice breakfast.
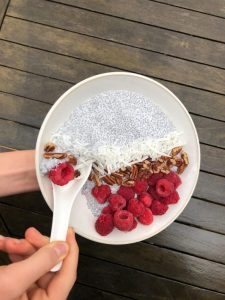
Grab & Go Coconut Chia Pudding – this takes a couple minutes to make the night before and then the next morning it’s ready for you to grab and eat in the car or once you get to school.
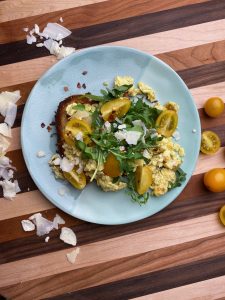
The Weekender Grilled Open Faced Brown Butter Egg Sandwich. This is just so good and takes about 15 minutes to make so it’s probably a good weekend option. This is kind of also a nice brunch option and we will also make this for dinner.
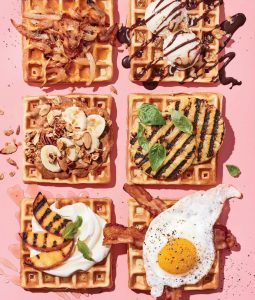
Anytime Waffles (from our cookbook The Teen Kitchen). We love our waffles – you can make a batch and freeze what you don’t eat so you can pop one in the oven or toaster before heading out the door for a grab and go in the morning. Yum!
Add Some Sprinkles! For those looking for an extra nutritional boost (protein, fiber, Omega 3s, carbs) – put some (extra) sprinkles on top. By sprinkles we mean hemp, chia or hemp. Sprinkle these on these recipes or yogurt, smoothies, cereal, toast. We recommend:
Milled Flax – don’t get the whole seeds – they just go through you without the benefits of giving you the nutrition. These and hemp have a nutty kind of flavor.
Hemp seeds – these are just tiny seeds that kind of resemble a sesame.
Chia – these are black seeds – get the whole seed not the milled. You can get black or white. We usually get black just because that’s what’s in our store. Make sure these don’t stick in your teeth, they like to. And we always have chia on game days – it stores extra hydration, that is why it’s called the running seed.
RECIPES:
Coconut Chia Pudding
Makes 2 servings
Prep Time – 2 Minutes
“Cooktime” 1 hour+
Busy or lazy, this coconut chia pudding is perfect for anyone! It is super easy (only 4 ingredients) and all you have to do is mix and chill. The chia thickens the liquid into a pudding. Chia is really good for you – it has a ton of protein and Omega 3s. It’s an excellent food for athletes as it holds liquid – which is how this also forms into a pudding. Mix in all sorts of toppings from raspberries to cocoa nibs!
Note – this is not too coconutty, but the canned coconut milk gives this pudding a nice richness. We make 2 servings worth to have for a couple of days. Or you can share (:
We save jam jars to put this in for an easy grab and go. Twin Tip: Save your favorite jam or condiment jars – they are a really nice to-go container.
Ingredients:
1 cup coconut milk (from a can. make sure you shake /stir vigorously before opening)
1/4 cup almond milk (or your milk of choice)
1 tablespoon maple syrup (or a touch more if preferred)
1/4 cup chia seeds
Optional Mix In or Topping Ideas: 1-2 Tablespoons of sliced berries; chopped nuts; coconut shreds; cocoa nibs; nut butter; goji berries; etc.
Directions:
In a container that has a top, mix the milks and maple syrup together
Add the chia little by little, stirring so it is fully incorporated.
Taste the liquid – if you wish a little sweeter, as touch more maple syrup
Chill for at least 1 hour, or put fridge overnight and eat it the next morning. You can stir in the toppings overnight or add in the next morning.
Once it’s in pudding form, serve in your favorite jam jars for a to-go option.
The Weekender: Grilled Open Face Brown Butter Egg Sandwich
Makes 1 Sandwich
Prep Time: 5 minutes Cook time: 10 minutes
We love sandwiches open faced because you taste the “filling” that much more. We grill the bread because it tastes better. The egg is cooked in brown butter which gives it a super rich flavor. We top this with arugula because we love the bitter lemony taste of the arugula with the rich taste of the eggs and grilled toast, plus it’s good for you.
Twin Tip: Use regular mayonnaise in place of butter for the bread spread. Sounds weird, but it’s not – it grills perfectly and it’s super easy to spread.
Ingredients:
1 slice of your favorite bread
1 tablespoon of softened butter (good butter choice is Kerrygold) plus approx 1 teaspoon extra for scrambling eggs
2 eggs
1 tablespoon half and half or heavy cream
2 tablespoons of shredded cheese (we like shredded parmesan)
1 tablespoon baby arugula
2 cherry tomatoes, sliced in half
Salt & Pepper to taste
Optional hot sauce or extra virgin olive oil to drizzle on top
Directions:
Butter both sides of the bread (don’t skimp on buttering the corners).
Heat a skillet on medium and bread and grill for about 2-3 minutes per side until golden brown.
Remove grilled bread from pan and plate it.
In a small bowl, add the eggs, half and half or cream, salt and pepper and whisk vigorously.
In the same skillet, turn to medium heat and butter and wait until it starts to brown and sizzle.
Turn heat to low and add the eggs. Using a spatula, slowly and constantly stir the eggs into a light scramble, then mix in the cheese.
To plate, distribute the eggs onto your grilled toast. Top with a tablespoon arugula and tomatoes. Add a drizzle of olive oil and salt and pepper to taste.
Anytime waffles (reprinted from The Teen Kitchen*)
MAKES 12 WAFFLES
PREP TIME: 8 minutes COOK TIME: 12 minutes
While waffles are mostly a breakfast food, we enjoy them just as much for lunch or dinner with savory toppings—either open-faced or as a regular sandwich. We offer a variety of options below for savory or sweet waffles. By the way, as we were developing this recipe, we decided that waffle is just the weirdest word. Say it over and over again, and you’ll see what we mean.
Ingredients:
4 tablespoons unsalted butter
3 eggs
1 tablespoon sugar
1 3⁄4 cups milk
1 1⁄2 cups unbleached all purpose flour
1 tablespoon baking powder
1⁄4 teaspoon salt
Directions:
Preheat the oven to 200°F.
Melt the butter and let it cool a bit.
In a medium bowl, beat the eggs, sugar, and milk.
In a separate bowl, mix the flour, baking powder, and salt. Add the mixture to the wet batter and mix in the melted butter.
Grease a waffle iron. When it is hot, ladle 1⁄4 to 1⁄3 cup of batter into each waffle area. Close and cook for about 4 minutes each. Using a fork or tongs, carefully transfer the cooked waffles to a baking sheet and place in the warm oven until you’re ready to serve them. Add a topping from the options below and serve.
If you have leftovers, you can freeze your extra waffles. Just put them in a zip-top plastic bag after they have cooled down. They will keep in the freezer for up to a month. Pop them in the toaster or oven to reheat them.
Toppings (optional, see below)
SAVORY
Top with avocado, egg, bacon, soy Fakin’ Bacon (see Notes, page 123), and/or cheese.
Top with caramelized onions and cheese.
Use two waffles as “bread” to make a BLT (bacon, lettuce, and tomato sandwich) or grilled cheese sandwich.
SWEET
Top with maple syrup, jam, butter and cinnamon sugar, or honey and yogurt.
Top with ice cream and chocolate sauce or caramel sauce, or with grilled fruit.
Top with nut butter, sliced bananas, slivered almonds, and chopped pecans.
*Reprinted with permission from The Teen Kitchen, by Emily Allen and Lyla Allen, copyright © 2019. Published by Ten Speed Press, a division of Penguin Random House, LLC.
Photographs copyright © 2019 by Justin Walker.
Click here for more recipes from The Kitchen Twins.

